
Dot Waves
What Is This Animation?
Imagine hundreds of colorful dots floating across your website, moving in mesmerizing wave patterns like ripples on water, rolling ocean waves, chaotic energy bursts, or unpredictable random flows. This animation creates an eye-catching, dynamic background that brings your website to life, creating different visual effects—all running smoothly right in the browser using advanced 3D graphics technology (Three.js).
Whether you want a subtle, elegant touch or a bold, energetic background, this animation adapts to your needs. You can control everything from the size and appearance of the dots to how fast they move and what pattern they follow.
---
Easy Setup Guide
Step 1: Add Three.js to Your Website
First, you need to load the Three.js library, which powers the animation. Paste this line inside the <head> section of your HTML:
<script src="https://cdnjs.cloudflare.com/ajax/libs/three.js/r128/three.min.js"></script>
Step 2: Add the Animation Element
Click the button below to copy the complete animation element to your clipboard:
(Once copied, paste it into your Webflow designer where you want the animation to appear.)
[c-Wavy-dots]
Step 3: Customize Your Animation
Now the fun part! You can customize how your animation looks and behaves using simple attributes. Here's what each one does:
---
Animation Style
[a-data-flow-animation = random]
This chooses the movement pattern:
- "circle": Creates rippling waves that spread in all directions from the center, like dropping stones in a pond
- "waves": Simulates ocean waves rolling across the screen in one direction
- "chaos": Creates unpredictable, energetic movement with dots shifting and swirling randomly
- "random": Produces organic, irregular ripples with varying wave patterns that feel natural and less predictable
---
Animation Speed
[a-data-flow-animation-speed = 3]
This controls how fast the dots move. Values range from 0.1 (very slow) to 5 (very fast). Start with 1 for normal speed.
---
Dot Style
[a-data-flow-dot-type = fill]
This changes how the dots look. Use "fill" for solid dots, or "stroke" for ring-shaped hollow dots with just an outline.
---
Dot Size
[a-data-flow-dot-size = 6px]
This controls how big each dot appears. Use values between 3px and 10px for best results—smaller numbers create delicate dots, larger numbers make them more prominent.
---
First Color
[a-data-flow-dot-color-01 = red]
This sets the first color in your gradient. Use any hex color code (like #ff0000 for red or #00ff00 for green) or CSS color names (like "red", "blue").
---
Second Color
[a-data-flow-dot-color-02 = yellow]
This sets the second color. The dots will blend between your first and second colors, creating a beautiful gradient effect throughout the animation.
---
Color Mode
[a-data-flow-color-mode = gradient]
This controls how colors are distributed across the dots:
- "random": Each dot gets a random color between your first and second colors
- "gradient": Creates a smooth left-to-right gradient across all dots
- "solid": All dots use only the first color ([a-data-flow-dot-color-01])
---
Stroke Size (for ring dots)
[a-data-flow-stroke-size = 1px]
Important: This attribute only works when [a-data-flow-dot-type = stroke].
When using stroke dots, this controls how thick the ring outline is. Values between 1px and 3px work well. This determines the width of the ring's border.
---
Wave Direction
[a-data-flow-angle = 90]
Important: This attribute only works when [a-data-flow-animation = waves].
This sets which direction the waves flow:
- 0 = Waves move from right to left
- 90 = Waves move from bottom to top
- 180 = Waves move from left to right
- 270 = Waves move from top to bottom
---
Background Color
[a-data-flow-bg = #000]
This sets the background color of the animation container. Use any hex color code or "transparent" for no background. Default is transparent.
Complete HTML Structure
Here's how all the attributes look together in your HTML:
<div
   data-flow-animation="random"
   data-flow-animation-speed="3"
   data-flow-dot-type="fill"
   data-flow-dot-size="6px"
   ata-flow-dot-color-01="red"
   data-flow-dot-color-02="yellow"
   data-flow-color-mode="gradient"
   data-flow-stroke-size="1px"
   data-flow-angle="90"
   data-flow-bg="#000">
   <div id="wave-container" style="width: 100%; height: 500px;"></div>
</div>
That's it! Your wavy dots animation should now be running on your website.
---
Understanding the Animation Modes
The animation offers four distinct visual styles, each creating a different mood and energy:
Advanced Manual Setup
This section is for developers who want to understand the technical implementation and have full control over every aspect.
Required HTML Structure
Your HTML needs two essential components working together:
Parent Container (Outer Div)
This is the wrapper element that holds all configuration attributes. It must include the data-flow-* attributes that control every aspect of the animation's behavior and appearance. Think of this as the control panel for your animation.
Wave Container (Inner Div)
This is where the Three.js canvas actually renders. It must have the exact ID id="wave-container" and requires explicit dimensions through inline styles (both width and height must be defined). Without proper dimensions, the animation cannot calculate how many dots to create or how to position them.
Example Structure:
<div data-flow-animation="random"
   data-flow-animation-speed="3"
   data-flow-dot-type="fill"
   data-flow-dot-size="6px"
   ata-flow-dot-color-01="red"
   data-flow-dot-color-02="yellow"
   data-flow-color-mode="gradient"
   data-flow-stroke-size="1px"
   data-flow-angle="90"
   data-flow-bg="#000">
   <div id="wave-container" style="width: 100%; height: 500px;"></div>
</div>
The parent div acts as the configuration source, while the inner div provides the rendering space. Both are required for the animation to function properly.
---
Configuration Attributes Reference
How to choose the animation type
[a-data-flow-animation = random]
By changing this value, you select the wave pattern:
- "circle": Omnidirectional ripples spreading in all directions
- "waves": Directional waves rolling in a specific direction
- "chaos": Unpredictable, multi-layered chaotic movement
- "random": Organic, irregular ripples with varying wave patterns
---
How to adjust the animation speed
[a-data-flow-animation-speed = 3]
By changing this number, you control how fast the animation plays. Values range from 0.1 (very slow) to 5 (very fast). Higher numbers create faster, more energetic movement. The value is clamped between 0.1 and 5 for stability.
---
How to set the dot style
[a-data-flow-dot-type = fill]
By changing this value, you select between solid filled dots ("fill") or hollow ring-shaped dots ("stroke").
---
How to change the dot size
[a-data-flow-dot-size = 6px]
By changing this number, you control the radius of each dot in pixels. We recommend values between 3px-10px for optimal visual results.
---
How to set the first gradient color
[a-data-flow-dot-color-01 = red]
By changing this hex code or color name, you set the first color in the gradient spectrum. The dots will use this as one end of their color range.
---
How to set the second gradient color
[a-data-flow-dot-color-02 = yellow]
By changing this hex code or color name, you set the second color in the gradient spectrum. Dots will smoothly transition between your first and second colors.
---
How to set the color distribution mode
[a-data-flow-color-mode = gradient]
By changing this value, you control how colors are applied:
- "random": Each dot randomly picks a color between color-01 and color-02
- "gradient": Creates a smooth left-to-right gradient across the entire dot grid
- "solid": All dots use only the first color (color-01)
---
How to change the stroke thickness
[a-data-flow-stroke-size = 1px]
Requirement: This attribute only works when [a-data-flow-dot-type = stroke].
By changing this number, you control the thickness of the ring outline when using stroke-type dots. Values between 1px-3px are recommended. This defines the width of the ring's border.
---
How to set the wave direction
[a-data-flow-angle = 90]
Requirement: This attribute only works when [a-data-flow-animation = waves].
By changing this angle in degrees, you control the direction waves flow across your screen:
- 0 = Waves travel from right to left
- 90 = Waves rise from bottom to top
- 180 = Waves travel from left to right
- 270 = Waves fall from top to bottom
Think of it as setting the compass direction the waves are moving toward.
---
How to set the background color
[a-data-flow-bg = #000]
By changing this hex code or color value, you set the background color of the animation container. Use "transparent" to let your page background show through.
---
Technical Requirements
- Three.js r128 must be loaded before the script executes
- The wave-container element must exist in the DOM before script runs
- Container must have explicit dimensions (width and height)
- Parent element with data-flow attributes must wrap the container
---
Customization Tips
For unique effects, modify these values directly in the script:
Dot Density:
this.dotGap = 10; // Change to 5 for denser, 20 for sparser
Wave Intensity:
amplitude: 25 // Change to 15 for subtle, 40 for dramatic
Wave Tightness:
frequency: 0.02 // Change to 0.01 for longer waves, 0.04 for tighter
Opacity Range:
dot.material.opacity = 0.2 + 0.6 * normalizedZ;
// Change to 0.4 + 0.4 * normalizedZ for less variation
// Change to 0.0 + 1.0 * normalizedZ for full fade
Chaos Mode Intensity:
// In chaos mode, modify the lateral displacement:
dot.position.x = dot.originalPosition.x + Math.sin(...) * 5;
// Change 5 to 10 for more chaos, 2 for subtle movement
Random Mode Variation:
// Modify the random offset multiplier:
const randomOffset = Math.sin(dot.originalPosition.x * 0.4 + this.wave.time) +
Math.cos(dot.originalPosition.y * 0.4 + this.wave.time);
// Change 0.4 to 0.2 for slower variation, 0.6 for faster
// Modify distance modulation:
const distance = dot.originalPosition.distanceTo(new THREE.Vector3(0, 0, 0)) *
(1 + randomOffset * 0.4);
// Change 0.4 to 0.2 for subtle, 0.6 for extreme randomness
Dot Waves
Create mesmerizing wave patterns with colorful dots that flow across your website. Fully customizable colors, speed, and animation styles.

Webflow Localisation Anchor link fix
Fix anchor links on localized pages in Webflow. This drop-in script (1) detects secondary locales from the URL, (2) prefixes internal links that are missing the current locale, (3) preserves smooth scrolling for same-page #anchors, (4) skips language-switcher links via hreflang or data-flow-locale-skip, (5) avoids assets/external links, and (6) re-initializes Webflow IX2 after updates. Works from the <head> or “Before ”.
How to add a custom map to webflow with MapBox
This is how you can add a custom style map, connected to the CMS to your project
blur
aykut
ay

How to Auto-Update Your Footer Date in One Click? Copy 3
You don’t need to manually update the year in your footer anymore. Simply copy and paste our year component into Webflow ...

DONT REMOVE (EXAMPLE DATA)
You don’t need to manually update the year in your footer anymore. Simply copy and paste our year component into Webflow ...

Wavy 3D Blob Animation
A quick guide to embedding a dynamic 3D blob with Three.js and GSAP in Webflow—complete with copy‑to‑clipboard buttons for every code snippet.

Automatically Update Your Footer Date
You don’t need to manually update the year in your footer anymore. Simply copy and paste this component in your website

Template (do not delete)
You don’t need to manually update the year in your footer anymore. Simply copy and paste our year component into Webflow ...
You can copy-paste this component directly into your Webflow project and style it however you want.
[ag-0-d-This is the description]
[ag-0-a-name = value]
[ag-0-a-name = value]- This is the description[li-a-name = value]Click to Copy[li-a-name = value]
- This is the description[li-a-name = value][li-a-name = value]
- This is the description[li-a-name = value][li-a-name = value]
Quick Setup:
You can copy-paste this component directly into your Webflow project and style it however you want.
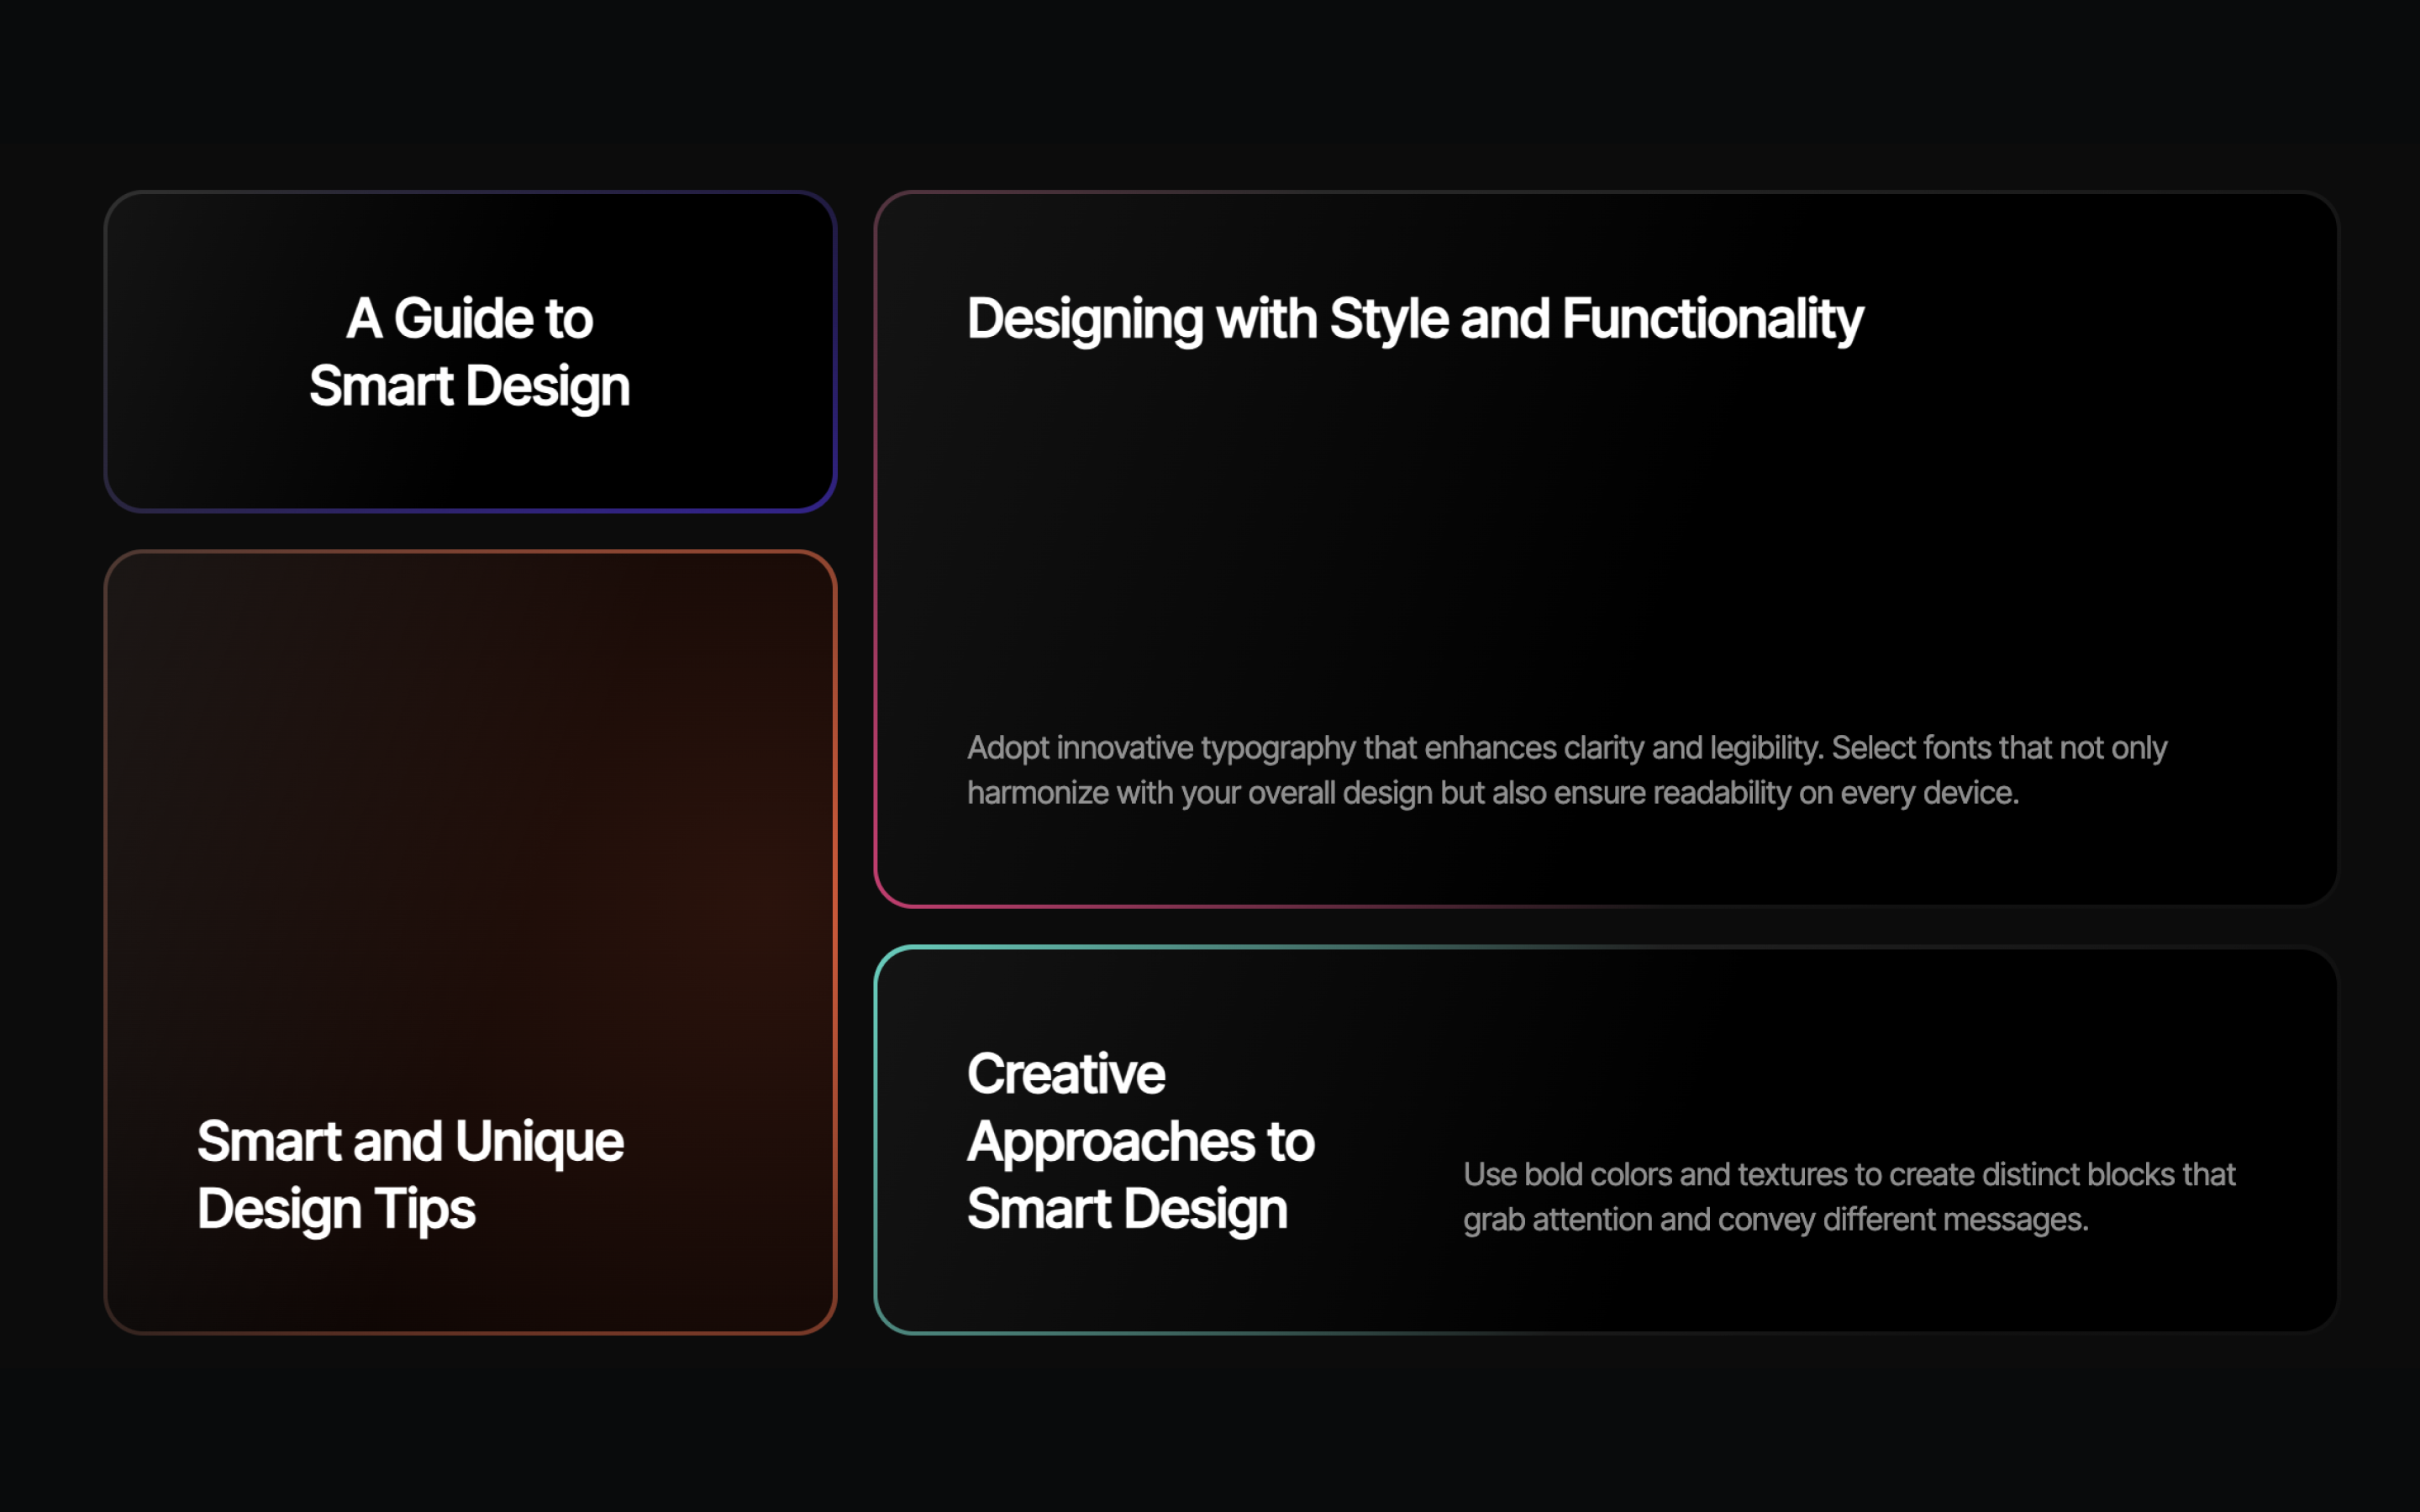
[c-Final - First Bento Grid]
Required Attributes:
- this is the head. should it be the first item or should it be the first heading before the list?
- data-flow = card: Defines the card element. The glow is inside this div.
- data-flow-color-border = #your-color: Sets the border glow color. Accepts CSS variables, functions, or static color values.
- data-flow-color-card = #your-color: Sets the inner glow color. Accepts CSS variables, functions, or static color values.
Optional Settings:
Use variables and the color-mix function. You can set the card’s inner glow to something like: [a-data-flow-color-card = "color-mix(in srgb, var(--pink) 20%, transparent)"]. Here we are using a color variable, which can be the same as the border [a-data-flow-color = "transparent)"] color, but set it to 20% opacity with the color-mix function.
In the code, there are two default values that you can change if you want.